Thrower For DJI Mavic 2 Pro AIR 2 Mini 2 Airdrop System Drone Air-Dropping Fishing Bait Wedding Ring Gift Deliver Accessory Kits


- Availability: In Stock
- Product Code: 1289400
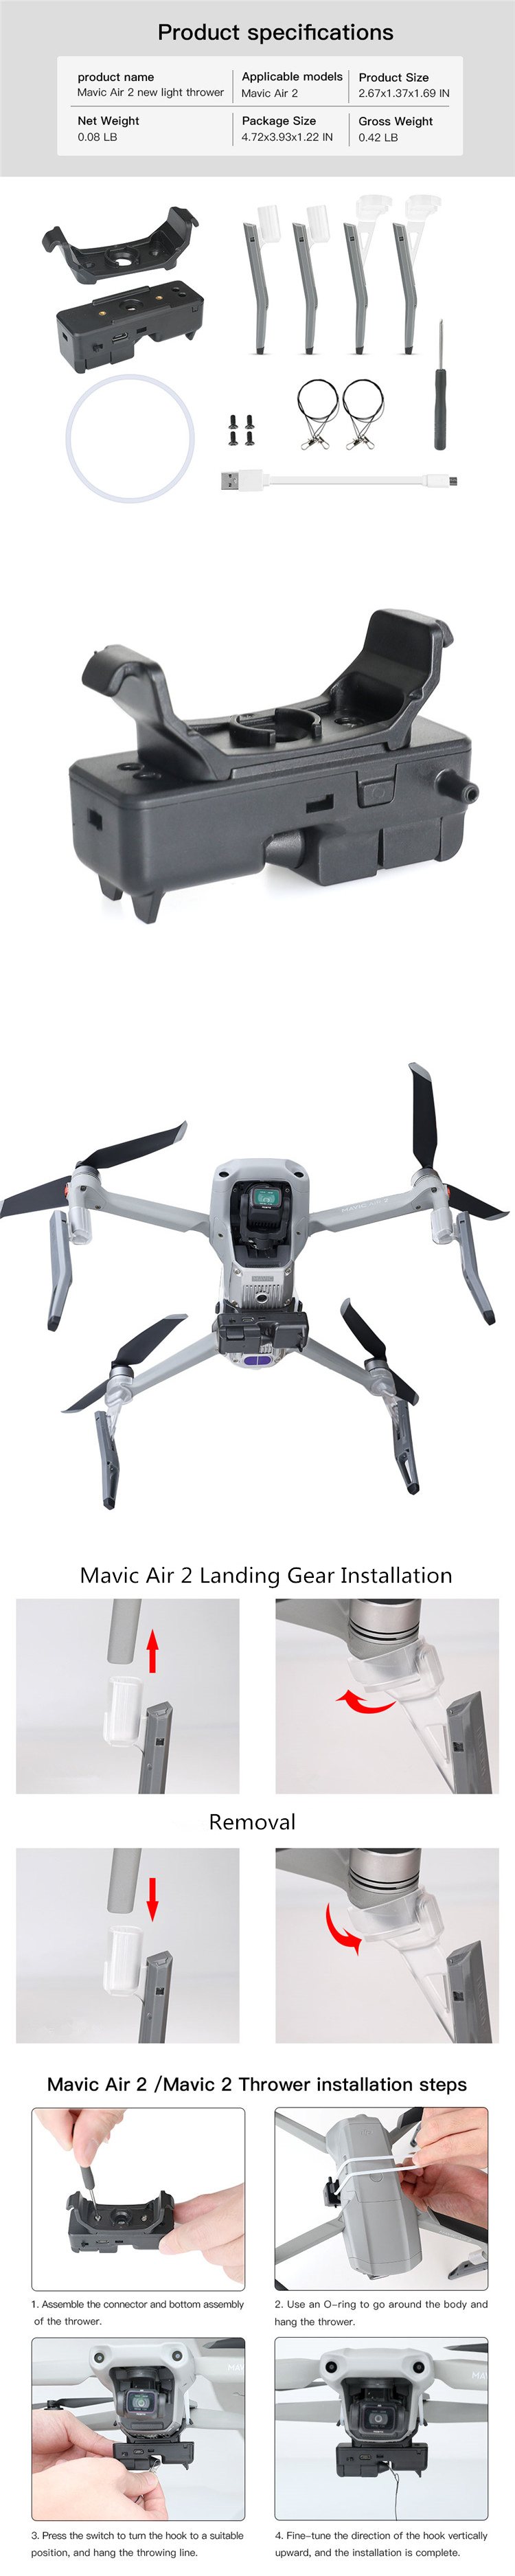
Version 1: For Mavic Air 2
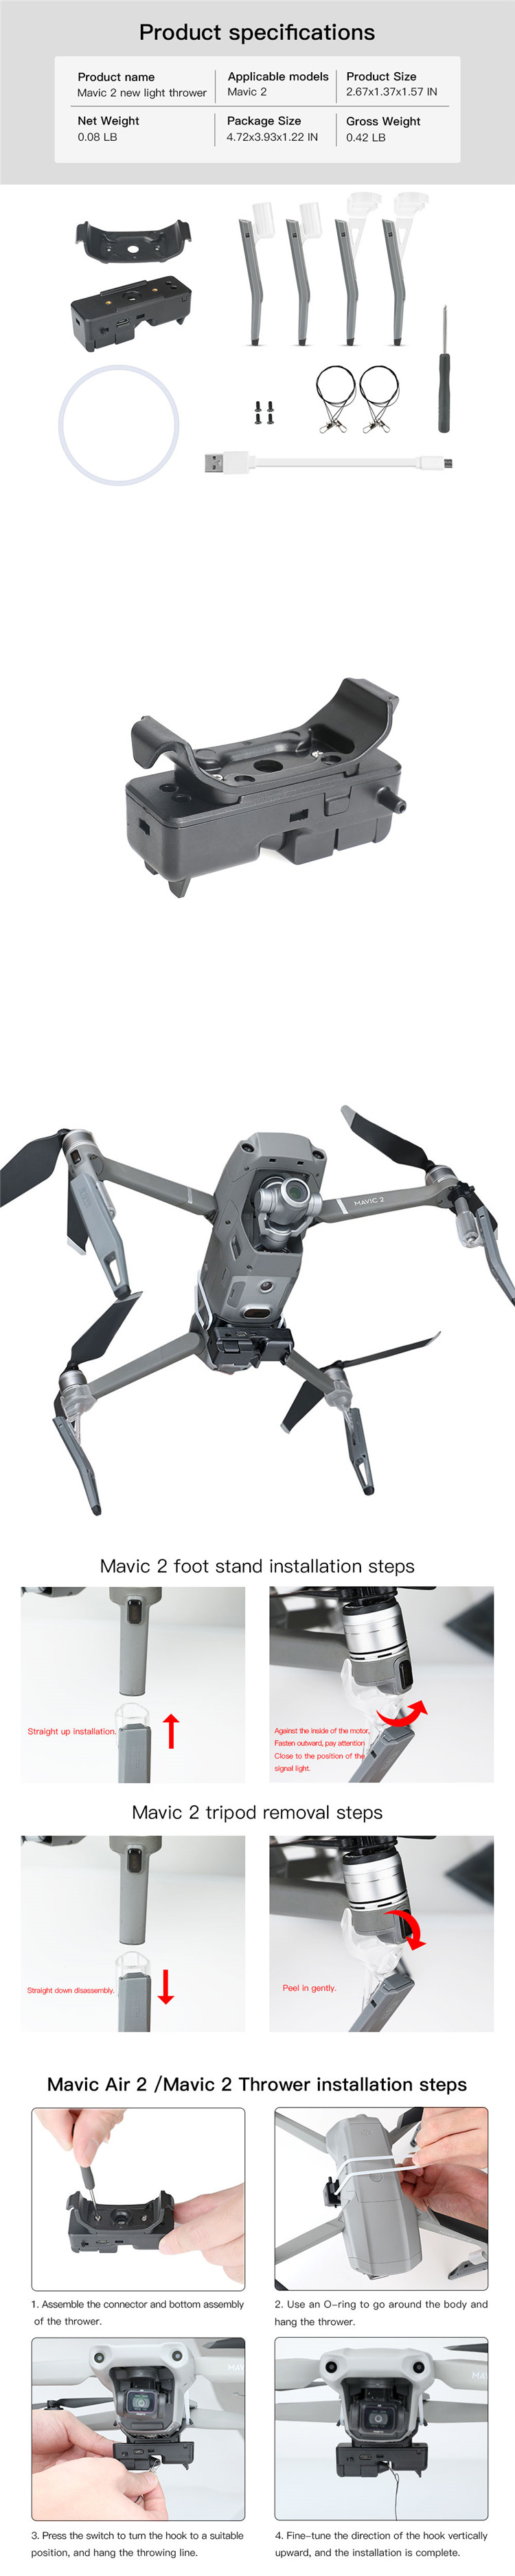
Version 2: For Mavic 2
Version 3: For Mavic Mini / Mini 2
Video link:
https://cloud.video.taobao.com/play/u/951951557/p/2/e/6/t/1/291691675265.mp4
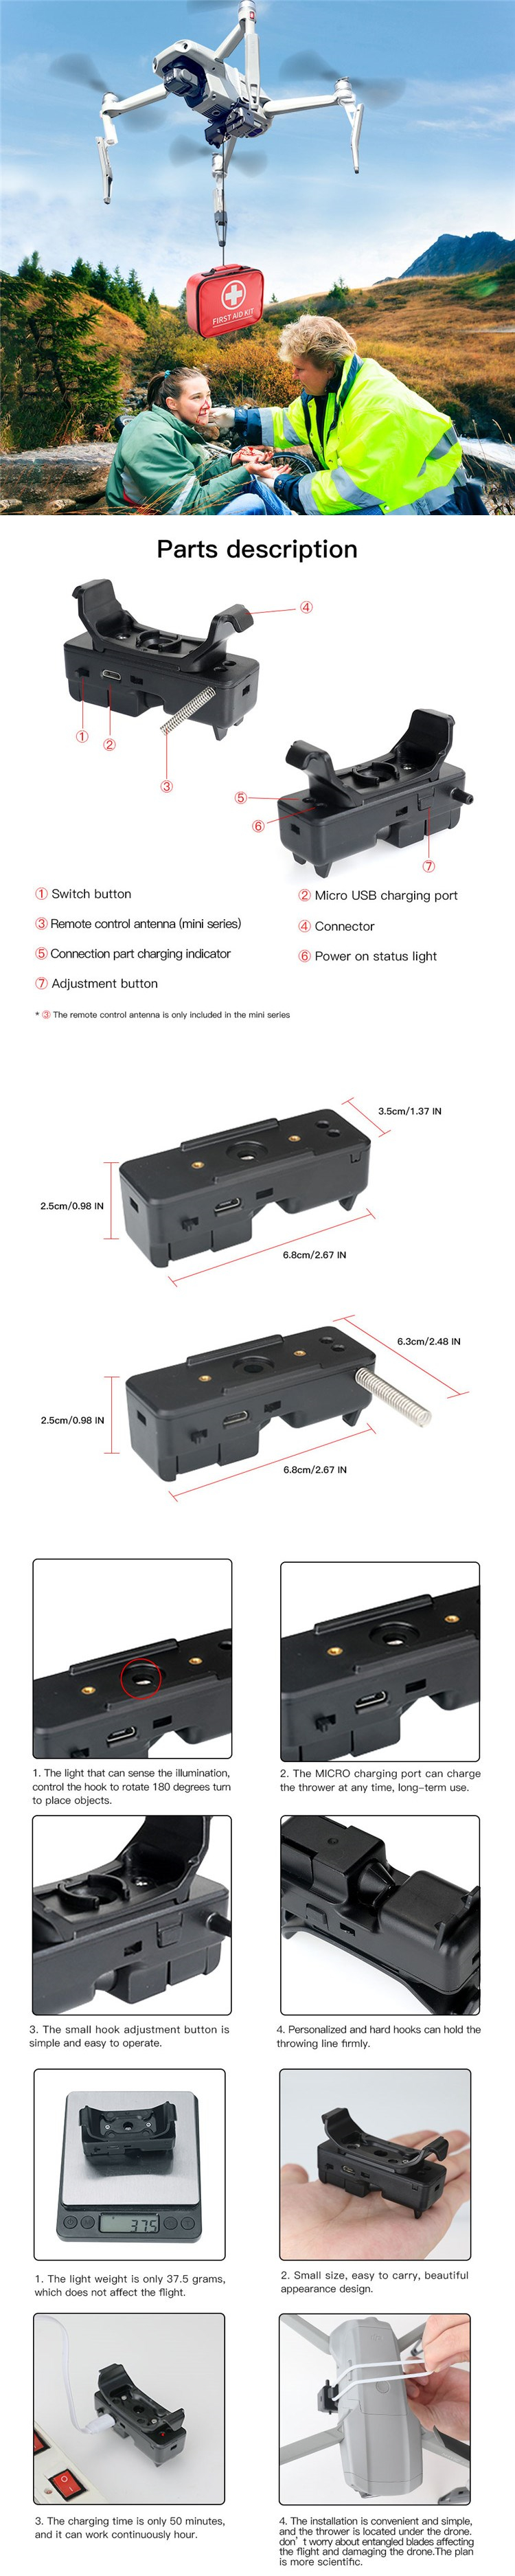
Parts description
①Switch button
②Micro USB charging port
③Remote control antenna (mini series)
④Connector
⑤Connection part charging indicator
⑥Power on status light
⑦Adjustment button
*③The remote control antenna is only included in the mini series
1. The light that can sense the illumination, control the hook to rotate 180 degrees turn to place objects.
2. The MICRO charging port can charge the thrower at any time, long-term use.
3. The small hook adjustment button is simple and easy to operate.
4. Personalized and hard hooks can hold the throwing line firmly.
Features
1. The light weight is only 37.5 grams, which does not affect the flight.
2. Small size, easy to carry, beautiful appearance design.
3. The charging time is only 50 minutes, and it can work continuously hour.
4. The installation is convenient and simple, and the thrower is located under the drone, don' t worry about entangled blades affecting the flight and damaging the drone. The plan is more scientific.
Mavic air 2 Thrower:
1.Battery capacity: 80mAh,
2.Use time: 5 hours,
3.Charging time: 50 minutes,
4.Product weight: 86.5g,
5.Can mount items within 500g
6.Remote control distance: 1-10km
Packing list: Mavic Air 2 connector x1, thrower x 1, 0- -ring x 2, tripod x 4,
throwing wire X 2, screws X 4, screwdriver X 1, Micro USB charging cable X 1
Mavic Air 2 /Mavic 2 Thrower installation steps
1. Assemble the connector and bottom assembly of the thrower.
2. Use an 0-ring to go around the body and hang the thrower.
3. Press the switch to turn the hook to a suitable position, and hang the throwing line.
4. Fine- -tune the direction of the hook vertically upward, and the installation is complete.
Mavic 2 pro / zoom Thrower:
1.Battery capacity: 80mAh,
2.Use time: 5 hours,
3.Charging time: 50 minutes,
4.Product weight: 89.8g,
5.Can mount items within 500g,
6.Remote control distance: 1-10km
Packing list: Mavic 2 connector x1, thrower X 1, O-ring X 2, tripod X 4,
throwing wire X 2, screws X 4, screwdriver X 1, Micro USB charging cable X 1
Mavic 2 foot stand installation steps
Straight up installation.
Against the inside of the motor,
Fasten outward, pay attention, Close to the position of the signal light.
Mavic 2 tripod removal steps
Straight down dis assembly. Peel in gently.
Mavic Air 2 /Mavic 2 Thrower installation steps
1. Assemble the connector and bottom assembly of the thrower.
2. Use an 0-ring to go around the body and hang the thrower.
3. Press the switch to turn the hook to a suitable position, and hang the throwing line.
4. Fine- -tune the direction of the hook vertically upward, and the installation is complete.
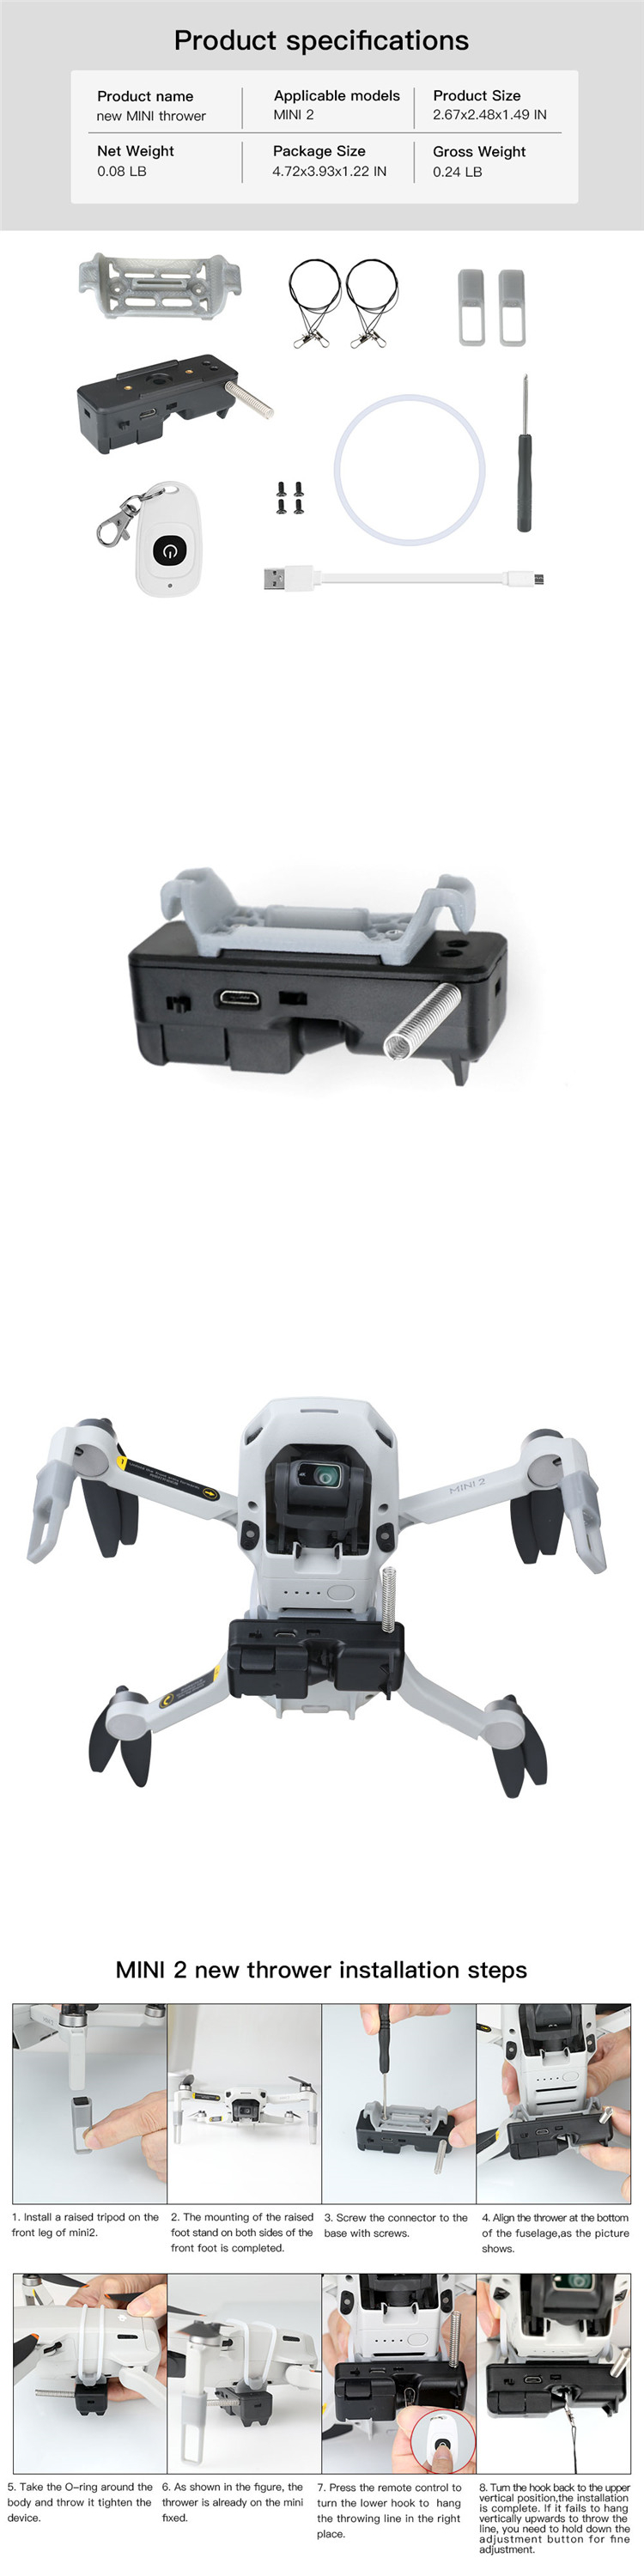
Mavic mini/ mini 2 Thrower:
1.Battery capacity: 80mAh,
2.Use time: 5 hours,
3.Charging time: 50 minutes,
4.Product weight: 44.4g,
5.Can mount items within 90g,6.Remote control distance: 30-40m
Packing list: MINI 2 connector x1 (3D printed), thrower x 1, remote control x 1, O -ring X 2,
tripod X 2 (3D printed), throwing wire X 2, screws X 4, screwdriver X 1, Micro USB charging cable X 1
Mavic Mini/ MINI 2 new thrower installation steps
1. Install a raised tripod on the front leg of mini2.
2. The mounting of the raised foot stand on both sides of the front foot is completed.
3. Screw the connector to the base with screws.
4. Align the thrower at the bottom of the fuselage,as the picture shows.
5. Take the O-ring around the body and throw it tighten the device.
6. As shown in the figure, the thrower is already on the mini fixed.
7. Press the remote control to turn the lower hook to hang the throwing line in the right place.
8. Turn the hook back to the upper vertical position,the installation is complete. If it fails to hang vertically upwards to throw the line, you need to hold down the adjustment button for fine adjustment.